Quick Edit Availability

SP2013

Hello everyone,

Today I’ll talk about the quick edit feature in SharePoint Classic display.

When you go to a list, you can use the Quick edit mode either by clicking on the ribbon or on the “edit” next to “new item”

Quick Edit Availability(1)

Once the button clicked, the view changed and you can edit the list the same way you edit content in Excel

Quick Edit Availability(2)

This can be useful but sometimes, the requirement is to disable this feature.

For this, you have two options:

First scenario, you need to disable it only for a specific view

  1. Click on modify/create the view
  2. Go down to the “Tabular view” section and uncheck the box “Allow individual item checkboxes”

Quick Edit Availability(4)


Second scenario, you need to disable it for the full list

  1. Click on your list settings and go to “Advanced settings”Quick Edit Availability(5)
  2. Go down to “Quick Edit” section and select “no” for “Allow items in this list to be edited using Quick Edit”

Quick Edit Availability(6)


For both scenario, the result will be that the “Edit this list” will not appear and the “Quick Edit” button will be greyed out.

Quick Edit Availability(3)

Of course, if you disabled on the list, it will not be available on a single view.

Hoping this helps!


Christopher.

Hide “Recent” link in classic mode

win

Hello everyone,

Today in the “Quick Win” section, I’ll talk about a small trick regarding “Recent” link in the navigation.

What is it?

The “Recent” link is a link added by SharePoint when you add a new app in your site and when you choose to NOT add it to the current navigation …

recent01.png


How to remove it?

Yeah, I really don’t know why Microsoft decided to add this feature, on most of my customer, when the navigation is defined, they don’t like to see it brutally changed without their permission.

First attempt to delete this annoying stuff, go to the navigation and click “Delete”. Yeah, it should work but…

If you don’t have the publishing infrastructure set on your site, you need to provide an url to the recent to be able to remove it (…) !

recent02

If you add a new app, the link gets back..

recent03


How to get rid of it?

First, I know my solution is not a wonderfull solution but it’s working as expected.   To do this, you will need to have the publishing infrastructure activated.

Create a SharePoint Group called “Recent Reader” and remove all the people from it.

recent04

Go to the navigation and apply an audience on the Recent link for the “Recent Reader” group.

recent05


Voila!

The link won’t be visible by anyone after that!


Hoping this helps!


Christopher


Use default rendering in JSLink

SP2013

Hello everyone,

Today I will talk about the JsLink we use to make custom displays in our good old classic 2013 interface.

A typical example is the following


(function () {
var ctx = {};
ctx.Templates = {};
ctx.Templates.Fields = {
'AssignedTo': {
'EditForm': renderAssignedTo
}
};
SPClientTemplates.TemplateManager.RegisterTemplateOverrides(ctx);
})();
function renderAssignedTo(ctx) {
//DO YOUR STUFF AND RETURN THE CONTENT
}

https://gist.github.com/ClementChristopher/03f25abc33c0d8ad2defc724ee1430c6.js

https://gist.github.com/ClementChristopher/03f25abc33c0d8ad2defc724ee1430c6.js

In this example, we change the rendering of the “AssignedTo” field with a custom html of our own.

This example can sometimes be too much for simple requests such as “I want to display this field in Read-Only”.

To do this, you can use the default SharePoint rendering!


(function () {
var ctx = {};
ctx.Templates = {};
ctx.Templates.Fields = {
'Text': {
'View': RenderFieldValueDefault,
'DisplayForm': SPField_FormDisplay_Default,
'EditForm': SPFieldText_Edit,
'NewForm': SPFieldText_Edit
},
'Number': {
'View': RenderFieldValueDefault,
'DisplayForm': SPField_FormDisplay_Default,
'EditForm': SPFieldNumber_Edit,
'NewForm': SPFieldNumber_Edit
},
'Integer': {
'View': RenderFieldValueDefault,
'DisplayForm': SPField_FormDisplay_Default,
'EditForm': SPFieldNumber_Edit,
'NewForm': SPFieldNumber_Edit
},
'Boolean': {
'View': RenderFieldValueDefault,
'DisplayForm': SPField_FormDisplay_DefaultNoEncode,
'EditForm': SPFieldBoolean_Edit,
'NewForm': SPFieldBoolean_Edit
},
'Note': {
'View': RenderFieldValueDefault,
'DisplayForm': SPFieldNote_Display,
'EditForm': SPFieldNote_Edit,
'NewForm': SPFieldNote_Edit
},
'Currency': {
'View': RenderFieldValueDefault,
'DisplayForm': SPField_FormDisplay_Default,
'EditForm': SPFieldNumber_Edit,
'NewForm': SPFieldNumber_Edit
},
'File': {
'View': RenderFieldValueDefault,
'DisplayForm': SPFieldFile_Display,
'EditForm': SPFieldFile_Edit,
'NewForm': SPFieldFile_Edit
},
'Calculated': {
'View': RenderFieldValueDefault,
'DisplayForm': SPField_FormDisplay_Default,
'EditForm': SPField_FormDisplay_Empty,
'NewForm': SPField_FormDisplay_Empty
},
'Choice': {
'View': RenderFieldValueDefault,
'DisplayForm': SPField_FormDisplay_Default,
'EditForm': SPFieldChoice_Edit,
'NewForm': SPFieldChoice_Edit
},
'MultiChoice': {
'View': RenderFieldValueDefault,
'DisplayForm': SPField_FormDisplay_Default,
'EditForm': SPFieldMultiChoice_Edit,
'NewForm': SPFieldMultiChoice_Edit
},
'Lookup': {
'View': RenderFieldValueDefault,
'DisplayForm': SPFieldLookup_Display,
'EditForm': SPFieldLookup_Edit,
'NewForm': SPFieldLookup_Edit
},
'LookupMulti': {
'View': RenderFieldValueDefault,
'DisplayForm': SPFieldLookup_Display,
'EditForm': SPFieldLookup_Edit,
'NewForm': SPFieldLookup_Edit
},
'Computed': {
'View': RenderFieldValueDefault,
'DisplayForm': SPField_FormDisplay_Default,
'EditForm': SPField_FormDisplay_Default,
'NewForm': SPField_FormDisplay_Default
},
'URL': {
'View': RenderFieldValueDefault,
'DisplayForm': SPFieldUrl_Display,
'EditForm': SPFieldUrl_Edit,
'NewForm': SPFieldUrl_Edit
},
'User': {
'View': RenderFieldValueDefault,
'DisplayForm': SPFieldUser_Display,
'EditForm': SPClientPeoplePickerCSRTemplate,
'NewForm': SPClientPeoplePickerCSRTemplate
},
'UserMulti': {
'View': RenderFieldValueDefault,
'DisplayForm': SPFieldUserMulti_Display,
'EditForm': SPClientPeoplePickerCSRTemplate,
'NewForm': SPClientPeoplePickerCSRTemplate
},
'DateTime': {
'View': RenderFieldValueDefault,
'DisplayForm': SPFieldDateTime_Display,
'EditForm': SPFieldDateTime_Edit,
'NewForm': SPFieldDateTime_Edit
},
'Attachments': {
'View': RenderFieldValueDefault,
'DisplayForm': SPFieldAttachments_Default,
'EditForm': SPFieldAttachments_Default,
'NewForm': SPFieldAttachments_Default
}
};
SPClientTemplates.TemplateManager.RegisterTemplateOverrides(ctx);
})();

I want to thank the person who took time to compile this really useful information!

For my part, my source is the following: https://sharepoint.stackexchange.com/questions/112506/sharepoint-2013-js-link-return-default-field-rendering

Hoping this helps !

Christopher.

Quick Win – Display attachments in list

win

Hello everyone,

Today, in the Quick Win series, I’ll talk about the possibility to view attachments in a list view.

By default, when you have one or more attachments to a list item, you see this

attachment1

If you open the properties of the item, you see the full list of attachments

attachment2

To display the full list of attachments in the view of your list, simply add the following JSLink (don’t forget to fix the path for the JQuery file)

(function () { 

// jQuery library is required
(window.jQuery || document.write('<script src="PATH/jquery.min.js"><\/script>'));
// Create object that have the context information about the field that we want to change it output render  

var linkFiledContext = {};
linkFiledContext.Templates = {};
linkFiledContext.Templates.Fields = {
"Attachments": { "View": AttachmentsFiledTemplate }
}; 

SPClientTemplates.TemplateManager.RegisterTemplateOverrides(linkFiledContext); 

})(); 

// This function provides the rendering logic for list view
function AttachmentsFiledTemplate(ctx) {
var itemId = ctx.CurrentItem.ID;
var listName = ctx.ListTitle;
return getAttachments(listName, itemId);
} 

function getAttachments(listName,itemId) {
var url = _spPageContextInfo.webAbsoluteUrl;
var requestUri = url + "/_api/web/lists/getbytitle('" + listName + "')/items(" + itemId + ")/AttachmentFiles";
var str = "";
// execute AJAX request
$.ajax({
url: requestUri,
type: "GET",
headers: { "ACCEPT": "application/json;odata=verbose" },
async: false,
success: function (data) {
for (var i = 0; i < data.d.results.length; i++) {
str += "<a href='" + data.d.results[i].ServerRelativeUrl + "'>" + data.d.results[i].FileName + "</a>";
if (i != data.d.results.length - 1) {
str += "
";
}
}
},
error: function (err) {
console.log(err)
}
});
return str;
}

Et voila!

attachment3

I wish I had the idea but I did not write this code, I found it on this msdn topic (Thanks Denis Guo)

Hoping this helps!

Christopher

Quick Win – Show PDF file preview in classic mode

win

Hello everyone,

Today, in the “Quick Wins” series I will talk about the preview of pdf document in SharePoint in “Classic” mode.

Problematic

As a user,

I want to see the preview of my pdf documents in my library and in my search result

In order to take advantage of this functionality in the same way as for office documents.

Cause

By default PDF files do not display the preview in the call-out menu

In libraries

pdfpreview01

In search result
pdfpreview02

Resolution

In order to use the preview of a PDF, we will tell SharePoint to use Word’s functionality for PDF files.

In libraries

We will use a jsLink file to integrate on desired views. The script to use is the following

window.onload = function () {

SP.SOD.executeFunc('filePreview.js', null, function () {

embeddedWACPreview.dimensions["pdf"] = embeddedWACPreview.dimensions["docx"];

filePreviewManager.previewers.extensionToPreviewerMap["pdf"] = filePreviewManager.previewers.extensionToPreviewerMap["docx"];

});

};

Put this script in a .js file, store it in a library in your site collection, and populate the jsLink in the view.

In search result
Simply create a result type based on the one used for Word and tell it to target pdf documents..

Go to the “Site settings”

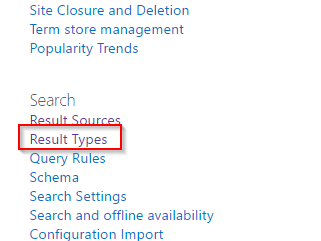
In the “Search” section, click “Result Types”

pdfpreview03

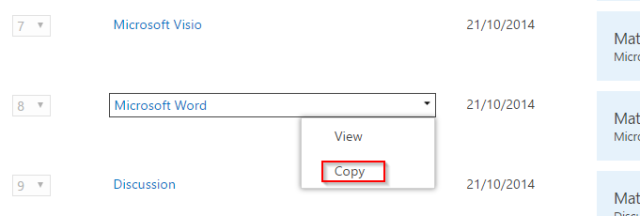
Scroll down to Result Type “Microsoft Word” and click “Copy”

pdfpreview04

Give the name you want (PDF) ,choose the “PDF” content type and click “Save”

pdfpreview05.png

Results

In libraries

pdfpreview06

In search result

pdfpreview07.png

Hoping this helps!

Christopher

Quick Win – Display more view in the selector

win

Hello everyone,

Today I will inaugurate a new type of post that I want to set up, quick wins.

The purpose of these articles is to show a quick configuration to meet a common business need.

Problematic

As a user

I want to see more views in the view selector

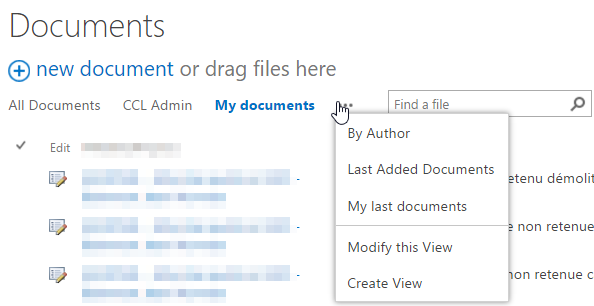
In order to have more choice without clicking the ellipse

Cause

By default, the SharePoint view selector (in classic view) shows only 3 views among the views defined.

viewselector1

Resolution

By adding a JavaScript on the page, you can display more views. (Replace the 5 number by the number of view you want to display).

ExecuteOrDelayUntilScriptLoaded(overrideSurfacePivotCount, 'clienttemplates.js');
function overrideSurfacePivotCount() {
ClientPivotControl.prototype.SurfacedPivotCount = 5;
};

viewselector2

Hoping this helps.

Christopher.